


Next: Data selection criteria
Up: Performance of a Prototype
Previous: Introduction
Experimental arrangement
This section briefly describes the experimental layout
of the RICH-1 prototype detector.
A full description of the apparatus, and the detector configurations used,
can be found in [3].
The tests make use of two distinct geometrical configurations of
detector prototype, referred to throughout as Configurations 1 and 2.
Configuration 1 is a
 scale model of RICH-1.
It is used with a total of 5, and later 7, HPDs to study the
photon yield and Cherenkov angle resolution from aerogel and the
photon yield from gas radiators. Configuration 2 is a full-scale
prototype of the optical layout of RICH-1 and is used to
measure the Cherenkov angle resolution with the
C4F10 gas
radiator. The geometry and characteristics of the two
configurations are described below :
- Configuration 1 consists of a vessel of
dimensions 800x600x600 mm. The vessel is
aligned such that the beam passes through a block of
aerogel, followed by 400 mm of air or
C4F10 gas
radiator. This is shown schematically in
Figure 1.
Figure:
Schematic layout of Configuration 1, the
 -scale prototype RICH-1 vessel.
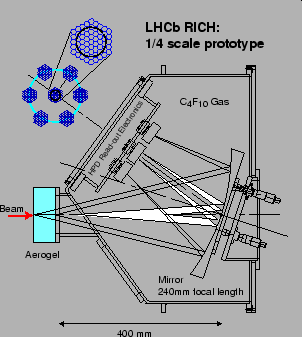 |
Cherenkov photons produced are reflected and focused by the mirror
onto an array of HPDs. These are mounted on movable elements,
placed
246 mm from the mirror centre, at an 18o tilt
relative to the beam.
- Configuration 2 uses two extension tubes to
increase the active gaseous radiator length of Configuration 1 to
1 m. The mirror focal length is also increased to
1117 mm. The geometry is shown schematically in Figure 2.
Figure:
Schematic layout of Configuration 2, the
full-scale prototype RICH-1 detector.
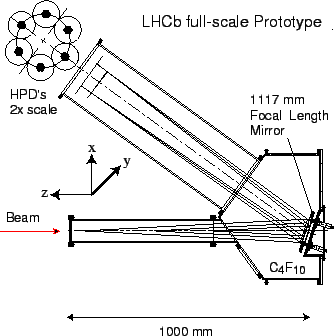 |
A three-dimensional coordinate system is defined for the
purpose of reconstruction and alignment. The origin of the orthogonal
axes is defined to lie at the point where the beam intersects the
mirror surface. The z-axis then lies along the beam
direction, pointing upstream. The x-axis is then defined to
lie in the horizontal plane in the direction of the detector plane,
with the y-axis pointing vertically upwards. The two detector
configurations share common components which are :
- The radiators :
Two types of silica aerogel samples are used, both with areas of
110 x 110 mm2 perpendicular to the input beam direction.
They are referred to here and in [3] as samples 1 and 2, with
thicknesses of 18 and 11 mm
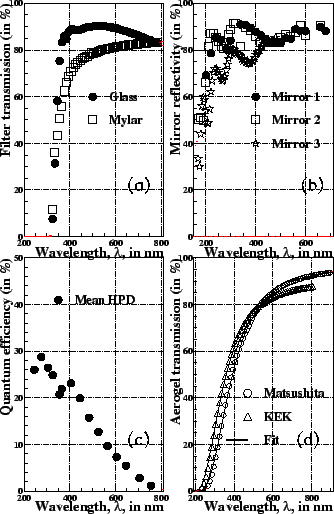
respectively2. Their optical transmissions were
measured in the laboratory and are shown in
Figure 3(d).
Figure:
(a) Transmission characteristics for glass and
mylar, (b) mirror reflectivity, (c) HPD detector quantum
efficiency and (d) measured and fitted aerogel transmission curves
as funct ion of wavelength.
 |
The aerogel samples have nominal refractive indices of
n  1.03,
and are positioned 425 mm upstream of the mirror centre. Fits to
the transmission curves shown in Figure 3(d), both
return a clarity coefficient of
0.008
  m4/cm. The
dimensions of the air and
C4F10 gas radiators in
each configuration are given in Table 1.
- The detector plane :
The photodetector plane holds up to seven 61-pixel hybrid
photo-diodes3, contracted from
the DEP company. These are run at a common acceleration voltage
of between 10 and
12 kV during normal
operation [3]. The detectors are read out individually
using VIKING VA2[5] amplifiers with a shaping time of
 1.2
1.2 s. The detectors and their electronics are mounted onto
a plate where, after initial alignment, their (x, y) positions and
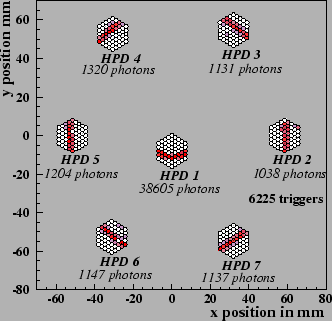
rotation angles are fixed. The orientation and numbering of the HPDs on the detector plane is indicated in
Figure 4.
Figure:
A display of accumulated events, within a single run,
shown on the front face of the detector
plane of HPDs indicating the 7 detector positions. The ring is
due to photons emitted in the
C4F10.
 |
Filters are placed over some of the HPD input windows to
restrict the detected wavelength. In these tests, borosilicate
glass and mylar filters are used.
- The mirrors:
These are mounted on the backplate of the vessel and held on three
micrometer screws. They are adjusted to align the Cherenkov ring image
onto the centre of the detector plane. The focal lengths of the
mirrors used in each detector configuration are given in
Table 1.
- The gas circulation system :
The RICH vessel is connected to a gas recycling and purification
system [3] that cycles
C4F10 gas
approximately once every hour. For
these tests, a slight overpressure is maintained.
Table:
Measured global geometry parameters for the
three RICH configurations.
| Quantity |
Value |
| Mirror-to-beam Angle |
18 ( 2)o 2)o |
| Mirror Focal Lengths : |
|
| Configuration 1 |
236 ( 2) mm 2) mm |
| Configuration 2 |
1117 ( 10) mm 10) mm |
| Mirror-to-detector distance : |
|
| Configuration 1 |
245 or 250 mm |
| Configuration 2 |
1143 ( 4) mm 4) mm |
|
The prototype RICH vessel was sited in the CERN T9 beam,
which is a secondary beam derived from extracted PS protons, and
provides charged particles of either polarity. Particle momenta from
2  15.5GeV/c are available. The particle type (e,
 , K, p) can be separated using a
CO2 threshold Cherenkov
counter, installed 30 m upstream of the prototype.
Incident beam particles are selected using two upstream and two
downstream scintillation counters. The last two are placed 4 m apart
and the smallest scintillator (
4 x 4 mm2) defines the
accepted beam size and an expected beam divergence of not more than
3 mrad. Scintillators 1 and 4 are
50 x 50 mm and
cover the
whole beam. The readout is triggered by the four scintillation
counters in coincidence. During a typical extraction pulse of
200ms duration,
5 x 10³ beam particles enter the detector
volume, resulting in  30 triggers.
In Configuration 2, the beam trajectory is measured using a silicon
telescope. This consists of three planes of silicon-pad
detectors. Each plane has 22x22 pads, with pad dimensions
1.3 x 1.3 mm2. The planes are placed upstream of the prototype
and separated by approximately 1 m. The purpose of the telescope is
to allow event-by-event track direction measurement from which
the Cherenkov angle can be more precisely measured, giving a beam
trajectory uncertainty of approximately
0.38 mrad. This assumes
perfect geometrical alignment, and is discussed later in
Section 4. Analogue signals from this detector
are read out using the same digitiser as the HPDs, as described
in [3].


Next: Data selection criteria
Up: Performance of a Prototype
Previous: Introduction
latex2html conversion by www person on 2000-01-23
![]() scale model of RICH-1.
It is used with a total of 5, and later 7, HPDs to study the
photon yield and Cherenkov angle resolution from aerogel and the
photon yield from gas radiators. Configuration 2 is a full-scale
prototype of the optical layout of RICH-1 and is used to
measure the Cherenkov angle resolution with the
C4F10 gas
radiator. The geometry and characteristics of the two
configurations are described below :
scale model of RICH-1.
It is used with a total of 5, and later 7, HPDs to study the
photon yield and Cherenkov angle resolution from aerogel and the
photon yield from gas radiators. Configuration 2 is a full-scale
prototype of the optical layout of RICH-1 and is used to
measure the Cherenkov angle resolution with the
C4F10 gas
radiator. The geometry and characteristics of the two
configurations are described below :

![]() 30 triggers.
30 triggers.